Adding New Records and Closing Records - Inspection/Planned Maintenance Records
The Inspection form contains two tabs - Summary and Response.
This form can be used to administer both Asset Inspections as well as Scheduled Maintenance.
To enter a new Inspection, fill in the required fields in both of these tabs.
These tabs also contain some additional fields that will need to be updated upon completion of the inspection.
Note that Work Tickets can also be generated from the Inspection form via the Response tab if required.
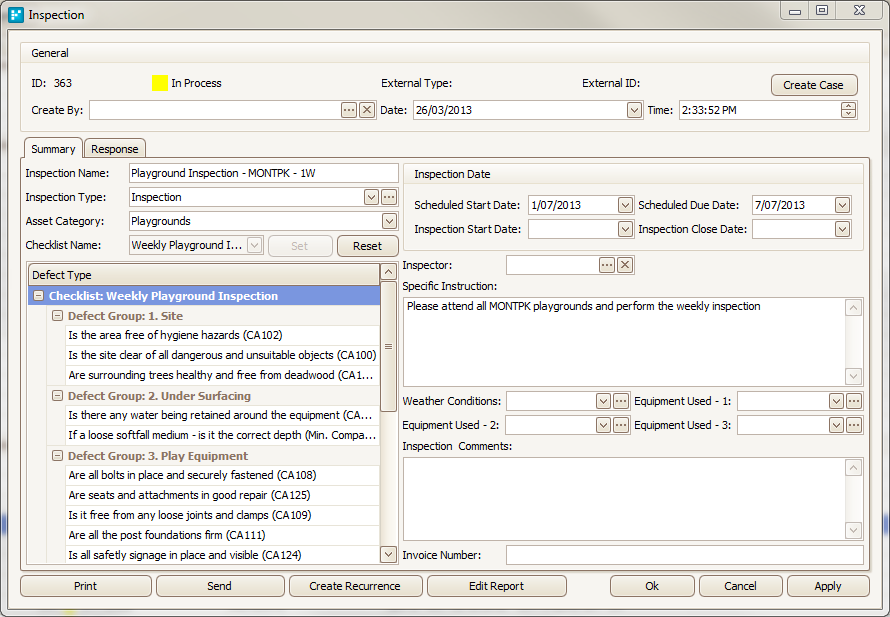
Summary Tab
This holds the overall details of the inspection/scheduled maintenance task, including the scheduled start and end dates.
Inspection form - Summary tab
The following fields are captured in the Inspection Form Summary tab:
ID - A unique database identification number is generated automatically upon creation of the inspection.
Inspection Status - Displays the current status of the inspection e.g. In Progress.
Create By - If you are logged into myData with a username and password, your name can be populated automatically when you create a new Inspection record.
- if this is not happening, please contact your system administrator to ensure that your login has been properly linked to a myData contact.
- to add a person manually, click on the ellipsis button (...), select the name of the person you want to add from the address book and hit Assign.
- if the required contact is not yet listed, add the new contact.
Date/Time - This is the current date and time and is automatically populated upon creation of the inspection record.
Inspection Name - Type in a name for the inspection.
Inspection Type - Click the drop-down arrow and select the type of inspection that is to take place from the list provided.
- if you have the appropriate permissions, you may add new inspection types to the list, by hitting the ellipsis button (...).
Asset Category - Select the relevant asset category from the drop-down list. Checklist Nanodrop-down the appropriate checklist by clicking on the drop-down arrow and clicking the Set button.
- if the checklist you require does not appear in this list, you will need to go back and add it to the Inspection Form Setup/Checklist Customisation area under Tools and Configurations.
- the checklist contains may contain a list of elements that must be examined as part of the inspection, or a step-by-step breakdown of the tasks to take place for scheduled maintenance.
Scheduled Start Date - Using the drop-down arrow, select the start date that will be scheduled for the inspection.
Scheduled Due Date - Using the drop-down arrow, select the date that the inspection is due.
Inspection Start Date - Once the inspection begins, the actual start date can be added here.
Inspection Close Date - Once the inspection is complete and results submitted, the actual close date can be added here. Once a close date is entered, the Inspection Status will be set to close.
Inspector - Using the ellipsis button, select the person who will undertake the inspection from the address book.
Specific Instruction - Additional information for the person conducting the task may be added here.
Weather Conditions/Equipment Used/Inspection Comments - Upon completion of the Inspection, any observations or comments from the inspector may be added in this section.
Invoice Number - If an invoice needs to be linked back to the inspection, the invoice number can be entered here.
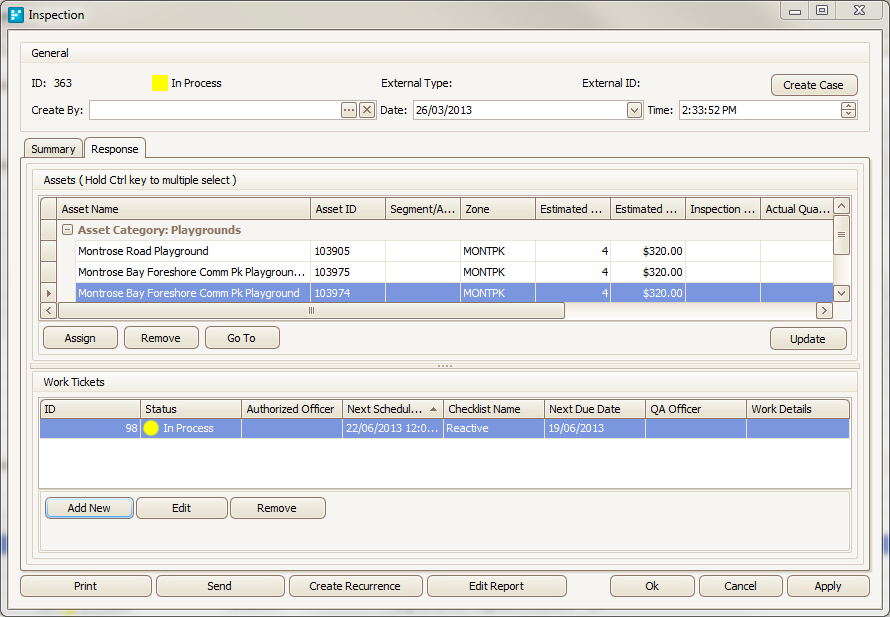
Response Tab
This area contains a list of assets to include as part of the inspection/scheduled maintenance task. It also includes a set of asset-specific data, such as costs and dates per asset:
Inspection form - Response tab
The following fields are captured in the Inspection form Response tab:
Assets - This section lists all assets that should be inspected or included as part of the scheduled maintenance organised via this form.
- to assign a single asset or group of assets to this list, click the Assign button to activate the Advanced Asset Search window.
- using the tools provided locate and highlight the desired asset/s before hitting Select Asset to add the asset/s to the inspection.
Asset Information - The Assets section holds asset-specific information.
- the Asset Name, Asset ID, Segment/Amenity and Zone fields are populated automatically based on the assets selected.
- the Estimated Quantity and Estimated Cost fields can be populated during job planning and later used to compare to actual figures.
- the Inspection Date, Actual Quantity, Actual Cost, Weather Condition, Quality Check and Work Required fields can be populated with information upon completion of the inspection.
- to update Asset Information, highlight the asset row or rows you want to update and hit the Update button.
- enter information into the pop-up window and hit OK to save your changes to the selected assets.
Work Tickets - Upon completion of the inspection, if it is found that additional work is required for any of the assets listed.
- you may proceed to attach a new Work Ticket to the request by clicking Add New.
- if you click on various assets within the assets list, you will be able to view any attached Work Tickets in this section.
Apply/Cancel/OK - OK saves and closes the Inspection window, Cancel closes the Inspection window and discards any changes, Apply saves the Inspection and keeps it open.
Print - The inspection can be printed in report form by clicking the Print button. This printed report becomes a checklist of assets and tasks to complete, ideal for the inspector to take out in the field with them as they are conducting inspections.
Send - Clicking this button will send an email to the person assigned to this Inspection with the Inspection printout attached as a PDF file.
Create Recurrence - If this inspection is to occur as per a routine schedule, recurrences can be created here according to a specified time interval. This will ensure that future inspections are logged and available for viewing.
